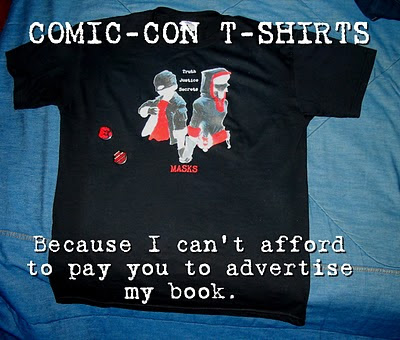
 Okay, here’s how I put together the T-shirts the stylin’ Masks Posse wore to Comic-Con. These directions tell you how to create the image on a black T-shirt, which is considerably harder than on a white one. All images referenced in this post are available in this Photobucket album.
1. Snag the image of Rae and Trevor holding hands—either full-color or black, white, and red. Save it to your computer.
2. Open it using the GIMP image manipulation freeware (available at http://www.snapfiles.com/reviews/The_GIMP/gimp.html)
3. Copy the image (right-click + “Copy”).
4. Open a new image in GIMP of the same dimensions (my version was 4844 x 5358 pixels).
5. From the “Layers” menu, select “Add Alpha Channel.”
6. Also from the “Layers” menu, select “Color to Alpha” and set the color to whatever the background color of your image is. (In my case, it was white.)
7. Paste the Rae-Trevor image onto your new image.
8. Now here’s the tricky and time-consuming and crazy-making part. Using the Eraser tool from the main GIMP toolbox, erase all the parts of the image that aren’t Rae and Trevor. All that uniform white around them? Erase as much of it as you can, keeping as close to their bodies as you can without erasing the figures. You will see a checkerboard pattern emerge as you erase the black. Everywhere you see checkerboard, you will have a transparent image. So erase everything you don’t want to see on a shirt.
9. Save the file as a PNG file, and jump through any hoops GIMP makes you jump through to do that.
10. Go to http://www.cafepress.com/make/custom-t-shirts.
11. Click on whatever T-shirt you want to design. I created this design for a black T-shirt, so I recommend something that comes in black. There are sizing charts and whatall—just pick what you like, click on the shirt, and go to the shirt designer.
12. Upload your image to Cafepress. If it’s too big, go back to GIMP and re-save your image in a smaller size.
13. Add the text to your shirt. I used the Chandler font in a dark red for “MASKS” and in white for “Truth / Justice / Secrets.”
14. Drop your image onto the shirt and pull it around and resize it until it’s where you want it. The pattern will let you center your image, but please note that Rae’s and Trevor’s hands are slightly off-center because Trevor’s throwing arm sticks out a little more on his side. I chose to center their hands over the S in MASKS, and centered the text. Don’t go outside the boundaries of the design area on the shirt. Nothing outside that box will print.
15. When you’re satisfied, click “Done” and order your shirt!
TO DO THIS ON A WHITE SHIRT:
Just upload the image and add the text. No muss, no fuss.
TO MAKE BUTTONS:
The button images are available too. Upload them to either Cafepress or Zazzle.com (the site I used this time around), center and jigger them around until you’ve got what you want, and then order as many buttons as you can stand.
There. You are now the most stylish walking billboard in town!
I've been offered an 8th grade English poistion! :-D
ReplyDeleteYahooooo! Congratulations!
ReplyDelete